
Non-operative Rehabilitation for Rotator Cuff Tendonitis/Tears
Rotator Cuff Home Exercise Program
This is a general conditioning program that provides a wide range of exercises.
Your doctor, athletic trainer, or physical therapist can help guide you through this program, which is broken up into 3 parts:
Range of motion - you should do this every day to help get your motion back.
Flexibility - you should do this every day to help stretch tight tissues.
Strengthening - you should do this 3 or 4 days each week to help get your strength back.
Length of program: This shoulder conditioning program should be continued for 4 to 6 weeks, unless otherwise specified by your doctor or physical therapist. After your recovery, these exercises can be continued as a maintenance program for lifelong protection and health of your shoulders. Performing the exercises two to three days a week will maintain strength and range of motion in your shoulders.
Getting Started
Warmup: Before doing the following exercises, warm up with 5 to 10 minutes of low impact activity, like walking or riding a stationary bicycle.
Stretch: After the warm-up, do the stretching exercises shown on Page 1 before moving on to the strengthening exercises. When you have completed the strengthening exercises, repeat the stretching exercises to end the program.
Do not ignore pain: You should not feel pain during an exercise. Talk to your doctor or physical therapist if you have any pain while exercising.
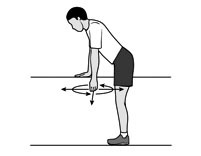
- Pendulum
|
Main muscles worked: Deltoids, supraspinatus, infraspinatus, subscapularis Equipment needed: None Repetitions: 2 sets of 10 Step-by-step directions · Lean forward and place one hand on a counter or table for support. Let your other arm hang freely at your side. · Gently swing your arm forward and back. Repeat the exercise moving your arm side-to-side, and repeat again in a circular motion. · Repeat the entire sequence with the other arm. Tip: Do not round your back or lock your knees.
|
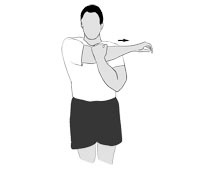
- Crossover Arm Stretch
|
Main muscles worked: Posterior deltoid Equipment needed: None Repetitions: 4 each side Step-by-step directions · Relax your shoulders and gently pull one arm across your chest as far as possible, holding at your upper arm. · Hold the stretch for 30 seconds and then relax for 30 seconds. · Repeat with the other arm. Tip: Do not pull or put pressure on your elbow.
|
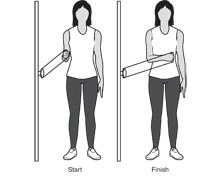
- Passive Internal Rotation
|
Main muscles worked: Subscapularis Equipment needed: Light stick, such as a yardstick Repetitions: 4 each side Step-by-step directions · Hold a stick behind your back with one hand, and lightly grasp the other end of the stick with your other hand. · Pull the stick horizontally as shown so that your shoulder is passively stretched to the point of feeling a pull without pain. · Hold for 30 seconds and then relax for 30 seconds. · Repeat on the other side. Tip: Do not lean over or twist to side while pulling the stick.
|
|

- Passive External Rotation
|
Main muscles worked: Infraspinatus, teres minor Equipment needed: Light stick, such as a yardstick Repetitions: 4 each side Step-by-step directions · Grasp the stick with one hand and cup the other end of the stick with the other hand. · Keep the elbow of the shoulder you are stretching against the side of your body and push the stick horizontally as shown to the point of feeling a pull without pain. · Hold for 30 seconds and then relax for 30 seconds. · Repeat on the other side. Tip: Keep your hips facing forward and do not twist.
|
|

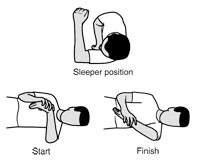
- Sleeper Stretch
|
Main muscles worked: Infraspinatus, teres minor Equipment needed: None Repetitions: 4 reps, 3x a day Step-by-step directions · Lie on your side on a firm, flat surface with the affected shoulder under you and your arm bent, as shown. You can place your head on a pillow for comfort, if needed. · Use your unaffected arm to push your other arm down. Stop pressing down when you feel a stretch in the back of your affected shoulder. · Hold this position for 30 seconds, then relax your arm for 30 seconds. Tip: Do not bend your wrist or press down on your wrist.
|
|
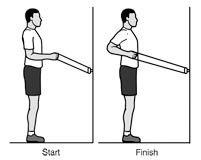
- Standing Row
|
Main muscles worked: Middle and lower trapezius Equipment needed: Use an elastic stretch band of comfortable resistance. As the exercise becomes easier to perform, progress to 3 sets of 12 repetitions. If you have access to a fitness center, this exercise can also be performed on a weight machine. A fitness assistant at your gym can instruct you on how to use the machines safely. Repetitions: 3 sets of 8 Step-by-step directions · Make a 3-foot-long loop with the elastic band and tie the ends together. Attach the loop to a doorknob or other stable object. · Stand holding the band with your elbow bent and at your side, as shown in the start position. · Keep your arm close to your side and slowly pull your elbow straight back. · Slowly return to the start position and repeat. Tip: Squeeze your shoulder blades together as you pull.
|
|
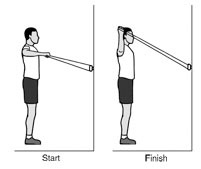
- External Rotation With Arm Abducted 90°
|
Main muscles worked: Infraspinatus and teres minor Equipment needed: Use an elastic stretch band of comfortable resistance. As the exercise becomes easier to perform, progress to 3 sets of 12 repetitions. If you have access to a fitness center, this exercise can also be performed on a weight machine. A fitness assistant at your gym can instruct you on how to use the machines safely. Repetitions: 3 sets of 8 Step-by-step directions · Make a 3-foot-long loop with the elastic band and tie the ends together. Attach the loop to a doorknob or other stable object. · Stand holding the band with your elbow bent 90° and raised to shoulder-height, as shown in the start position. · Keeping your shoulder and elbow level, slowly raise your hand until it is in line with your head. · Slowly return to the start position and repeat. Tip: Make sure your elbow stays in line with your shoulder.
|
|
- Internal Rotation
|
Main muscles worked: Pectoralis, subscapularis Equipment needed: Use an elastic stretch band of comfortable resistance. As the exercise becomes easier to perform, progress to 3 sets of 12 repetitions. If you have access to a fitness center, this exercise can also be performed on a weight machine. A fitness assistant at your gym can instruct you on how to use the machines safely. Repetitions: 3 sets of 8 Step-by-step directions · Make a 3-foot-long loop with the elastic band and tie the ends together. Attach the loop to a doorknob or other stable object. · Stand holding the band with your elbow bent and at your side, as shown in the start position. · Keep your elbow close to your side and bring your arm across your body. · Slowly return to the start position and repeat. Tip: Keep your elbow pressed into your side.
|
|
- External Rotation
|
Main muscles worked: Infraspinatus, teres minor, posterior deltoid Equipment needed: Use an elastic stretch band of comfortable resistance. As the exercise becomes easier to perform, progress to 3 sets of 12 repetitions. If you have access to a fitness center, this exercise can also be performed on a weight machine. A fitness assistant at your gym can instruct you on how to use the machines safely. Repetitions: 3 sets of 8 Step-by-step directions · Make a 3-foot-long loop with the elastic band and tie the ends together. · Attach the loop to a doorknob or other stable object. · Stand holding the band with your elbow bent and at your side, as shown in the start position. · Keeping your elbow close to your side, slowly rotate your arm outward. · Slowly return to the start position and repeat. Tip: Squeeze your shoulder blades together when you pull your elbow back.
|
|

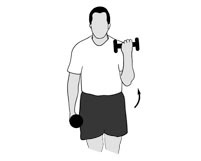
- Elbow Flexion
|
Main muscles worked: Biceps Equipment needed: Begin with a weight that allows 3 sets of 8 repetitions and progress to 3 sets of 12 repetitions. As the exercise becomes easier, add weight in 1-pound increments to a maximum of 5 pounds. Each time you increase the weight, start again at 3 sets of 8 repetitions. Repetitions: 3 sets of 8 Step-by-step directions · Stand tall with your weight evenly distributed over both feet. · Keep your elbow close to your side and slowly bring the weight up toward your shoulder as shown. · Hold for 2 seconds. · Slowly return to the starting position and repeat. Tip: Do not do the exercise too quickly or swing your arm.
|
|
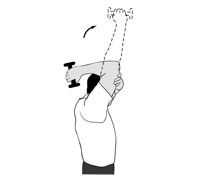
- Elbow Extension
|
Main muscles worked: Triceps Equipment needed: Begin with a weight that allows 3 sets of 8 repetitions and progress to 3 sets of 12 repetitions. As the exercise becomes easier, add weight in 1-pound increments to a maximum of 5 pounds. Each time you increase the weight, start again at 3 sets of 8 repetitions. Repetitions: 3 sets of 8 Step-by-step directions · Stand tall with your weight evenly distributed over both feet. · Raise your arm and bend your elbow with the weight behind your head. · Support your arm by placing your opposite hand on your upper arm. · Slowly straighten your elbow and bring the weight overhead. · Hold for 2 seconds. · Slowly lower your arm back down behind your head and repeat. Tip: Keep your abdominal muscles tight and do not arch your back.
|
|
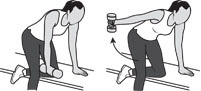
- Trapezius Strengthening
|
Main muscles worked: Middle and posterior deltoid, supraspinatus, middle trapezius Equipment needed: Begin with a light enough weight to allow 3 to 4 sets of 20 repetitions without pain. As the exercise becomes easier to perform, add 2 to 3 pounds of weight, but do fewer repetitions. Progress to 3 sets of 15 repetitions at each weight increment, with the maximum weight approximately 5 to 7 pounds. Repetitions: 3 sets of 20 Step-by-step directions · Place your knee on a bench or chair and lean forward so that your hand reaches the bench and helps support your weight. Your other hand is at your side, palm facing your body. · Slowly raise your arm, rotating your hand to the thumbs-up position and stopping when your hand is shoulder height, with your arm parallel to the floor. · Slowly lower your arm to the original position to a count of 5. Tip: Use a weight that makes the last few repetitions difficult, but pain-free.
|
|
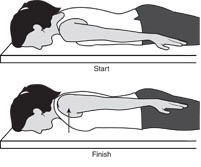
- Scapula Setting
|
Main muscles worked: Middle trapezius, serratus Equipment needed: None Repetitions: 10 Step-by-step directions · Lie on your stomach with your arms by your sides. · Place a pillow under your forehead for comfort, if required. · Gently draw your shoulder blades together and down your back as far as possible. · Ease about halfway off from this position and hold for 10 seconds. · Relax and repeat 10 times. Tip: Do not tense up in your neck.
|
|
- Scapular Retraction/Protraction
|
Main muscles worked: Middle trapezius, serratus Equipment needed: Begin with a weight that allows 2 sets of 8 to 10 repetitions and progress to 3 sets of 15 repetitions. As the exercise becomes easier, add weight in 1-pound increments to a maximum of 5 pounds. Each time you increase the weight, start again at 2 sets of 8 to 10 repetitions. Repetitions: 2 sets of 10 Step-by-step directions · Lie on your stomach on a table or bed with your injured arm hanging over the side. · Keep your elbow straight and lift the weight slowly by squeezing your shoulder blade toward the opposite side as far as possible. · Return slowly to the starting position and repeat. Tip: Do not shrug your shoulder toward your ear.
|
|
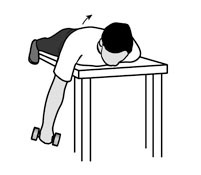
- Bent-Over Horizontal Abduction
|
Main muscles worked: Middle and lower trapezius, Infraspinatus, teres minor, posterior deltoid Equipment needed: Begin with a weight that allows 3 sets of 8 repetitions and progress to 3 sets of 12 repetitions. As the exercise becomes easier, add weight in 1-pound increments to a maximum of 5 pounds. Each time you increase the weight, start again at 3 sets of 8 repetitions. Repetitions: 3 sets of 8 Step-by-step directions · Lie on your stomach on a table or bed with your injured arm hanging over the side. · Keep your arm straight and slowly raise it up to eye level. · Slowly lower it back to the starting position and repeat. Tip: Control the movement as you lower the weight.
|
|
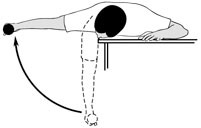
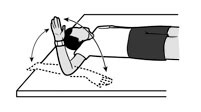
- Internal and External Rotation
|
Main muscles worked: Internal rotation: anterior deltoid, pectoralis, subscapularis, latissimus. Equipment needed: Begin with a light enough weight to allow 3 to 4 sets of 20 repetitions without pain. As the exercise becomes easier to perform, add 2 to 3 pounds of weight, but do fewer repetitions. Progress to 3 sets of 15 repetitions at each weight increment, with the maximum weight approximately 5 to 7 pounds. Repetitions: 3 to 4 sets of 20 Step-by-step directions · Lie on your back on a flat surface. · Extend your arm straight out from the shoulder and bend the elbow 90° so that your fingers are pointed up. · Keeping your elbow bent and on the floor, slowly move your arm in the arc shown. Bring your elbow down to a 45° angle if you experience pain at 90°. Tip: Use a weight that makes the last few repetitions difficult, but pain-free.
|
|
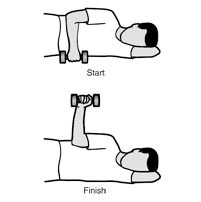
- External Rotation
|
Main muscles worked: Infraspinatus, teres minor, posterior deltoid Equipment needed: Begin with weights that allow 2 sets of 8 to 10 repetitions (approximately 1 to 2 pounds), and progress to 3 sets of 5 repetitions. As the exercise becomes easier, add weight in 1-pound increments to a maximum of 5 pounds. Each time you increase the weight, start again at 2 sets of 8 to 10 repetitions. Repetitions: 2 sets of 10 Step-by-step directions · Lie on your side on a firm, flat surface with your unaffected arm under you, cradling your head. · Hold your injured arm against your side as shown, with your elbow bent at a 90° angle. · Keep your elbow against your side and slowly rotate your arm at the shoulder, raising the weight to a vertical position. · Slowly lower the weight to the starting position to a count of 5. Tip: Do not let your body roll back as you raise the weight.
|
|
- Internal Rotation
|
Main muscles worked: Subscapularis, teres major Equipment needed: Begin with weights that allow 2 sets of 8 to 10 repetitions (approximately 1 to 2 pounds), and progress to 3 sets of 5 repetitions. As the exercise becomes easier, add weight in 1-pound increments to a maximum of 5 pounds. Each time you increase the weight, start again at 2 sets of 8 to 10 repetitions. Repetitions: 2 sets of 10 Step-by-step directions · Lie on a firm, flat surface on the side of your affected arm. · Place a pillow or folded cloth under your head to keep your spine straight. · Hold your injured arm against your side as shown, with your elbow bent at a 90° angle. · Keep your elbow bent and against your body and slowly rotate your arm at the shoulder, raising the weight to a vertical position. · Slowly lower the weight to the starting position. Tip: Do not let your body roll back as you raise the weight. |